Introduction
Creating a World Clock app in flutter may seem like a complex task at first. But in this article we will learn how to we can make a world clock app using HTTP GET request, If you’re interested only in the source code it will be linked at the bottom of the post otherwise I recommend you to follow along. Now let us begin.
Features
- Ability to view the current time for a number of countries.
- Utilizes the API of WorldTimeAPI to fetch time data according to user input.
- The background corresponds to the current time it will be a sunny background during day time and a dark background during night time.
Project Setup
From your command line navigate to your code repository folder and type the following commandflutter create world_time_app
Now create the following folders in your “world_time_app” directory.
world_time_app/
├── assets/
│   └── flags/
│       [Flag image files go here]
├── lib/
│   ├── pages/
│   │   ├── choose_location.dart
│   │   ├── home.dart
│   │   └── loading.dart
│   └── utilities/
│       └── world_time.dart
Next go to your pubspec.yaml file and paste the following configuration inside.
name: world_time_app
description: A new Flutter project.

publish_to: 'none'

version: 1.0.0+1

environment:
  sdk: '>=3.1.1 <4.0.0'


dependencies:
  cupertino_icons: ^1.0.2
  flutter:
    sdk: flutter
  flutter_spinkit: ^5.2.0
  http: ^1.1.0
  intl: ^0.18.1

dev_dependencies:
  flutter_lints: ^2.0.0
  flutter_test:
    sdk: flutter


flutter:

  uses-material-design: true
  assets:
  - assets/
  - assets/flags/
Packages Used
| Package | Purpose |
| flutter_spinkit:^5.2.0 | To add page loading animations |
| http:^1.1.0 | For HTTP requests |
| intl:^0.18.1 | For Internationalized/Localized messages, Formats etc (In case you need it) |
Creating The World Clock App
Now that our project setup is complete, let’s begin the development process.
main.dart
First of all go to your main.dart file and paste the following code.
import 'package:flutter/material.dart';
import 'package:world_time_app/pages/choose_location.dart';
import 'package:world_time_app/pages/home.dart';
import 'package:world_time_app/pages/loading.dart';

void main() {
  runApp(MaterialApp(
    initialRoute: '/',
    routes: {
      '/': (context) => const Loading(),
      '/home': (context) => const Home(),
      '/location': (context) => const ChooseLocation(),
    },
  ));
}
Explanation
- First we import the required packages and classes (The classes we created in the “pages” folder).
- Then the runApp method is called and routes are initialized with initial route being the Loading screen.
world_time.dart
Next go to your world_time.dart file and add the following lines of code.
// ignore_for_file: avoid_print
import 'package:http/http.dart';
import 'dart:convert';

class WorldTimeApi {
  // Location Name For The UI
  String location;

  // The Time In The Location
  late String time;

  // Flag Asset Icon URL
  String flag;

  // Location API Endpoint URL
  String url;

  // To Indicate If To Display Sunny Or Dark Background Image
  late bool isDayTime;

  WorldTimeApi({required this.location, required this.flag, required this.url});

  Future<void> getTime() async {
    try {
      // Make The API Request
      Response response =
          await get(Uri.parse('http://worldtimeapi.org/api/timezone/$url'));

      // Map The Data
      Map data = jsonDecode(response.body);

      print(data);

      // Get Properties From Data
      String dateTime = data['datetime'];

      String timeStorage = await extractTime(dateTime);

      // Check For Day / Night
      isDayTime = await checkForTime(timeStorage);

      // Set Time
      time = timeStorage;
    } catch (e, stackTrace) {
      print('[ERROR] $e \nStackTrace: \n\n\n$stackTrace');
      time = '[ERROR] Unable To Fetch Time Data';
    }
  }

  Future<String> extractTime(String timeData) async {
    return timeData.substring(11, 16);
  }

  Future<bool> checkForTime(String timeStorage) async {
    int timeNow = int.parse(timeStorage.substring(0, 2));
    print(timeNow);
    return (timeNow > 6 && timeNow < 20 ? true : false);
  }
}
Explanation
WorldTimeApiis a model class that contains the properties and methods related to the data that will be fetched from the worldtimeapi.org website.- This class is also responsible for fetching and parsing the data returned by the HTTP request and then passed on to the calling function.
- This class also handles the logic for displaying Day or Night backgrounds and the proper flag associated with the selected region on our frontend.
loading.dart
Now go to your loading.dart file and paste the following code.
// ignore_for_file: use_build_context_synchronously

import 'package:flutter/material.dart';
import 'package:world_time_app/utilities/world_time.dart';
import 'package:flutter_spinkit/flutter_spinkit.dart';

class Loading extends StatefulWidget {
  const Loading({super.key});

  @override
  State<Loading> createState() => _LoadingState();
}

class _LoadingState extends State<Loading> {
  void setupWorldTime() async {
    // Create the WorldTimeApi instance
    WorldTimeApi instance =  WorldTimeApi(location: 'Karachi', flag: 'pakistan.png', url: 'Asia/Karachi');
    await instance.getTime();

    // Redirect To Home Page
    Navigator.pushReplacementNamed(context, '/home',arguments: {
      'location': instance.location,
      'flag': instance.flag,
      'time': instance.time,
      'isDayTime' : instance.isDayTime,
    });
  }

  @override
  void initState() {
    super.initState();
    setupWorldTime();
  }

  // Loading Screen
  @override
  Widget build(BuildContext context) {
    return const Scaffold(
      backgroundColor: Color(0xFF000000),
      body: Center(
        child: SpinKitCubeGrid(color: Colors.white,
        size: 50,
        )
      ),
    );
  }
}
Explanation
- This is our loading screen and also the point where we create our WorldTimeApi instance to fetch data from the server.
- We also create our home page here and pass the data to it.
home.dart
Go to your home.dart file and paste the following code
import 'package:flutter/material.dart';

class Home extends StatefulWidget {
  const Home({super.key});

  @override
  State<Home> createState() => _HomeState();
}

class _HomeState extends State<Home> {
  // Data property that will hold information sent by WorldTimeApi request
  Map<dynamic, dynamic> data = {};

  @override
  Widget build(BuildContext context) {

    // If data is not empty use the data otherwise assign the value of passed arguments
    data = data.isNotEmpty ?  data : ModalRoute.of(context)!.settings.arguments as Map;

    //print(data);

    // Set Background
    String bgImage = data["isDayTime"] ? "day.png" : "night.png";
    Color bgColor = data["isDayTime"] ? Colors.blue : Colors.indigo[700]!;


    // Build the UI
    return Scaffold(
      backgroundColor: bgColor,
      body: SafeArea(
          child: Container(
            decoration: BoxDecoration(
              image: DecorationImage(
                image: AssetImage('assets/$bgImage'),
                fit: BoxFit.cover,
                ),
            ),
            child: Padding(
                  padding: const EdgeInsets.fromLTRB(0.0, 120, 0, 0),
                  child: Column(
            children: [
              TextButton.icon(
                onPressed: (() async {
                  dynamic result = await Navigator.pushNamed(context, '/location');

                  setState(() {
                    data = {
                      'location' : result["location"],
                      'flag' : result["flag"],
                      'time' : result["time"],
                      'isDayTime' : result["isDayTime"],
                    };
                  });
                }),
                icon: Icon(
                  Icons.edit_location,
                  color: Colors.grey[300],
                  ),
                label: Text(
                  'Edit Location',
                  style: TextStyle(
                    color: Colors.grey[300],
                  ),
                ),
              ),
              const SizedBox(height: 20.0),
              Image(image:AssetImage('assets/flags/${data['flag']}'),
              ),
              Row(
                mainAxisAlignment: MainAxisAlignment.center,
                children: [
                  Text(
                    data['location'],
                    style: const TextStyle(
                      color: Colors.white,
                      fontSize: 28.0,
                      letterSpacing: 2.0,
                    ),
                  ),
                ],
              ),
              const SizedBox(
                height: 20.0,
              ),
              Text(
                data['time'],
                style: const TextStyle(
                  color: Colors.white,
                  fontSize: 66.0,
                ),
              ),
            ],
                  ),
                ),
          )),
    );
  }
}
Explanation
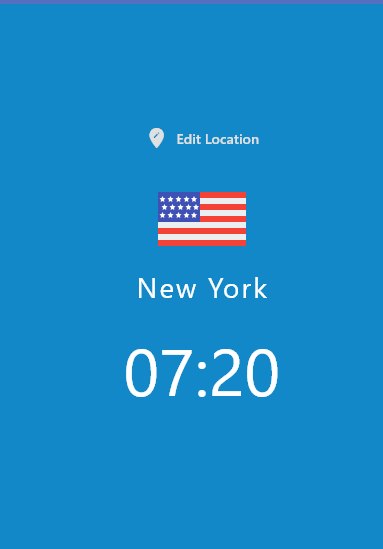
- This is the home page for our “World Time Clock App”.
- This is the class which will build our UI elements.
Output

choose_location.dart
Go to your choose_location.dart file and paste the following lines of code
import 'package:flutter/material.dart';
import 'package:world_time_app/utilities/world_time.dart';

class ChooseLocation extends StatefulWidget {
  const ChooseLocation({super.key});

  @override
  State<ChooseLocation> createState() => _ChooseLocationState();
}

class _ChooseLocationState extends State<ChooseLocation> {
// List of Locations
List<WorldTimeApi> locations = [
  WorldTimeApi(url: 'Europe/London', location: 'London', flag: 'uk.png'),
  WorldTimeApi(url: 'Europe/Athens', location: 'Athens', flag: 'greece.png'),
  WorldTimeApi(url: 'Africa/Cairo', location: 'Cairo', flag: 'egypt.png'),
  WorldTimeApi(url: 'Africa/Nairobi', location: 'Nairobi', flag: 'kenya.png'),
  WorldTimeApi(url: 'America/Chicago', location: 'Chicago', flag: 'us.png'),
  WorldTimeApi(url: 'America/New_York', location: 'New York', flag: 'us.png'),
  WorldTimeApi(url: 'Asia/Seoul', location: 'Seoul', flag: 'sk.png'),
  WorldTimeApi(url: 'Asia/Jakarta', location: 'Jakarta', flag: 'indonesia.png'),
  WorldTimeApi(url: 'Asia/Karachi', location: 'Karachi', flag: 'pakistan.png'),
  WorldTimeApi(url: 'Asia/Baghdad', location: 'Baghdad', flag: 'iraq.png'),
];

  @override
  void initState() {
    super.initState();
  }

  void updateTime(int index) async{
    // Create WorldTimeApi Instance
    WorldTimeApi locationInstance = locations[index];
    await locationInstance.getTime();

    // Close this page and send data back to home page
    Navigator.pop(context, {
      'location': locationInstance.location,
      'flag': locationInstance.flag,
      'time': locationInstance.time,
      'isDayTime' : locationInstance.isDayTime,
    });
  }


    // Build UI
  @override
  Widget build(BuildContext context) {
    return Scaffold(
      backgroundColor: Colors.grey[200],
      appBar: AppBar(
        backgroundColor: Colors.blue[900],
        title: Text('Choose a Location'),
        centerTitle: true,
        elevation: 0,
      ),
      body: ListView.builder(
        itemCount: locations.length,
        itemBuilder: (context,index){
          return Padding(
            padding: const EdgeInsets.symmetric(vertical: 1.0,horizontal: 4.0),
            child: Card(
              child: ListTile(
                onTap: ()=>{
                  updateTime(index),
                },
                title: Text(
                  locations[index].location
                ),
                leading: Image(
                  image: AssetImage('assets/flags/${locations[index].flag}'),
                ),
              )
            ),
          );
        },
        ),
    );
  }
}
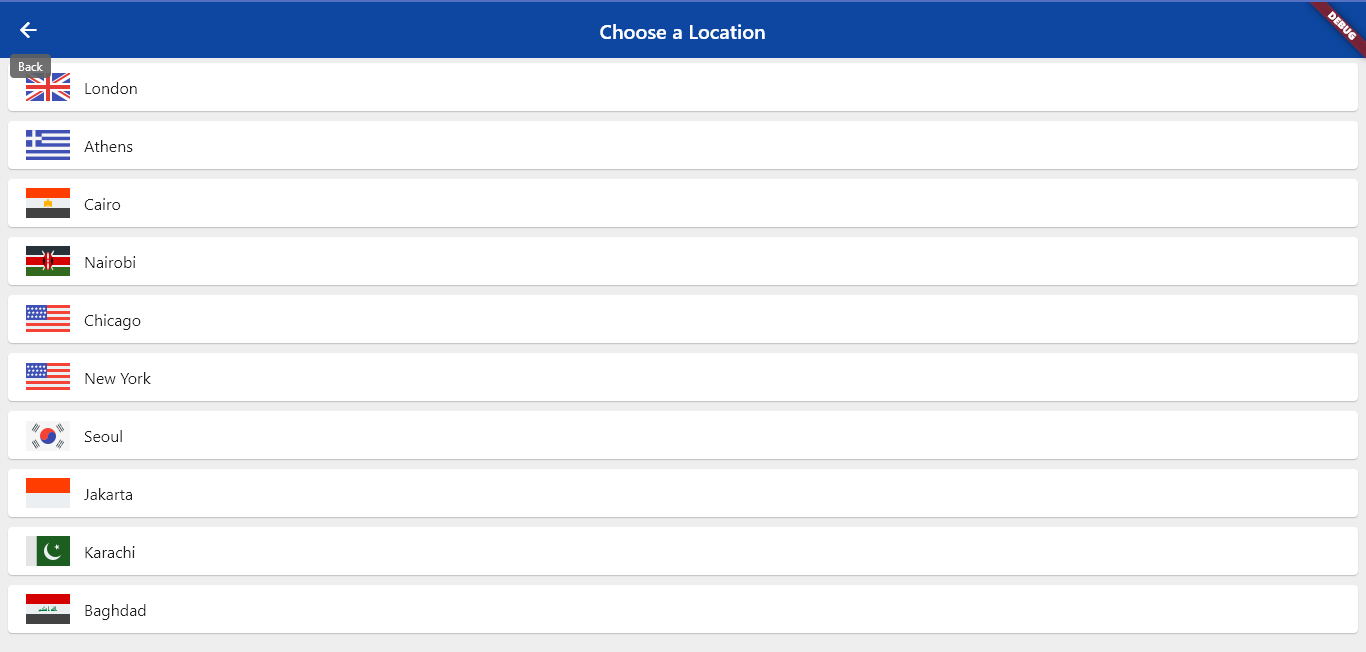
Explanation
- This class is responsible for rendering the time selection menu for different locations around the world.
- Furthermore when a location is selected the WorldTimeApi instance is created again and the data is fetched from the server according to the location selected by the user.
Output
World Clock App In Action
Source Code
Visit the Github Repository to download the source code.
Conclusion
In this tutorial we learned how to create a World Clock App in Flutter framework using the worldtimeapi.org API. Utilizing the API we also learned how to build our UI from the data we fetched and we also learned how we can implement a selection menu screen so we can choose between different locations. For more Flutter articles visit the Flutter Archives.